Since you made it to this page I assume that you read and followed the first article. If you didn’t, stop and go do that. Even if you aren’t using the SharePoint parts, you will need to configure your App in Azure to access the Microsoft Graph. Once you do that, come back here.
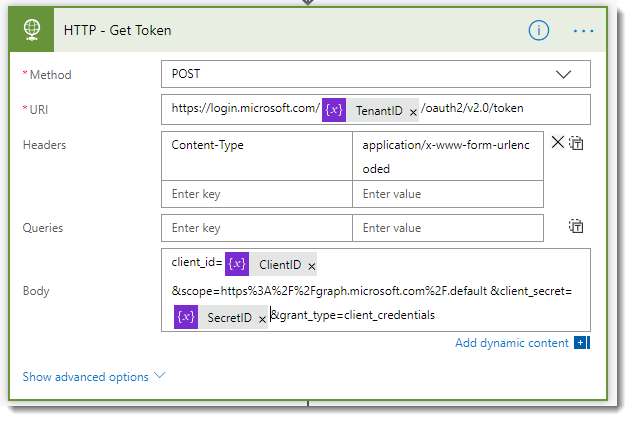
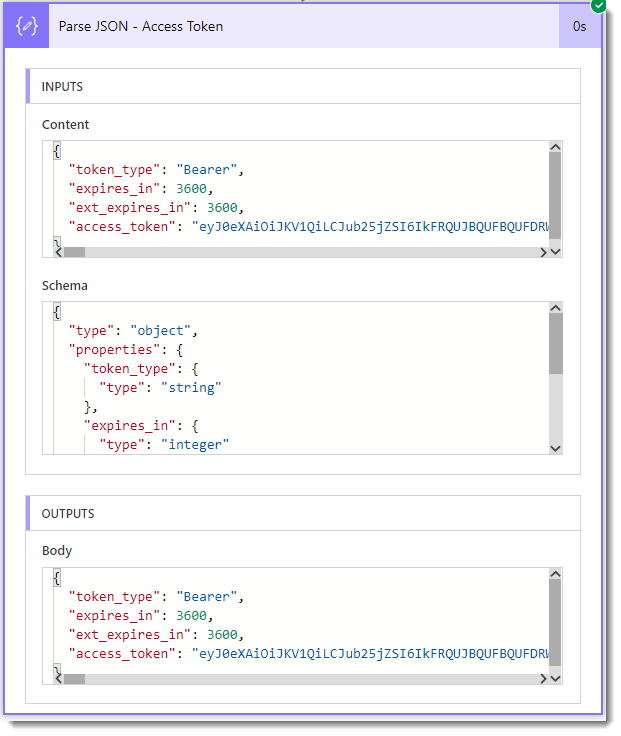
Save and Test your Flow. Correct any errors that ocurred and confirm that the HTTP - Get Token action returned an access-token.
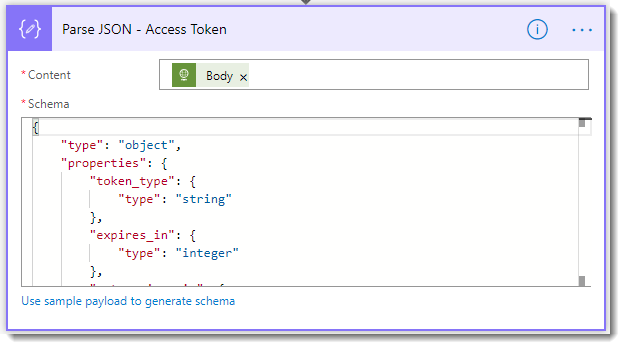
Grab the Schema
In several places in this exercise, you are going to use a Parse JSON action on the response body of the HTTP action. The Parse JSON action needs to know the schema of the response to perform it’s work. Here is how to save yourself a ton of time.
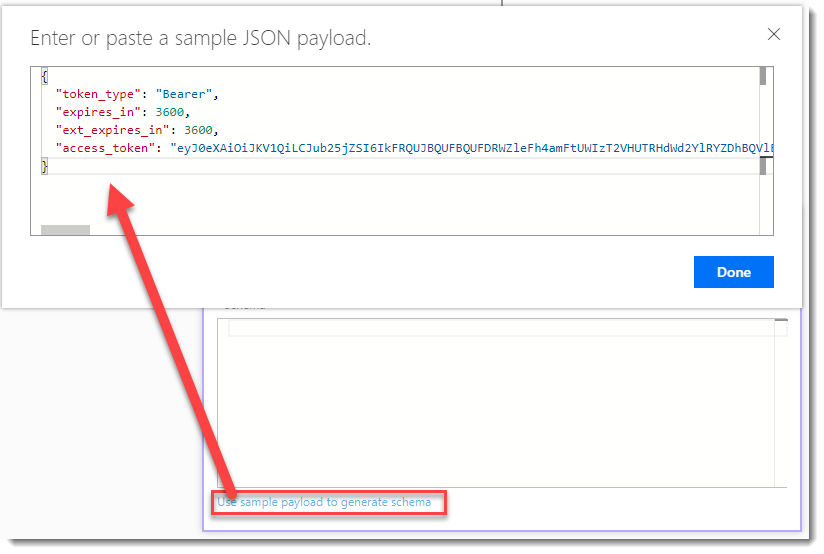
Select and copy the response body from the HTTP - Get Token action in your test. It should look like this:
Return to Edit mode for your flow and add a new step Parse JSON action. Rename it to Parse JSON - Access Token.
Set the Content property to the body of the HTTP - Get Token action.
Click Use sample payload to generate schema and paste the response body you copied previously and click Done.
You should see the Schema result interpreted from the response body.
Save your Flow and test it again. You should see that the Parse JSON action correctly parsed the result from the HTTP action.
Make the First Request
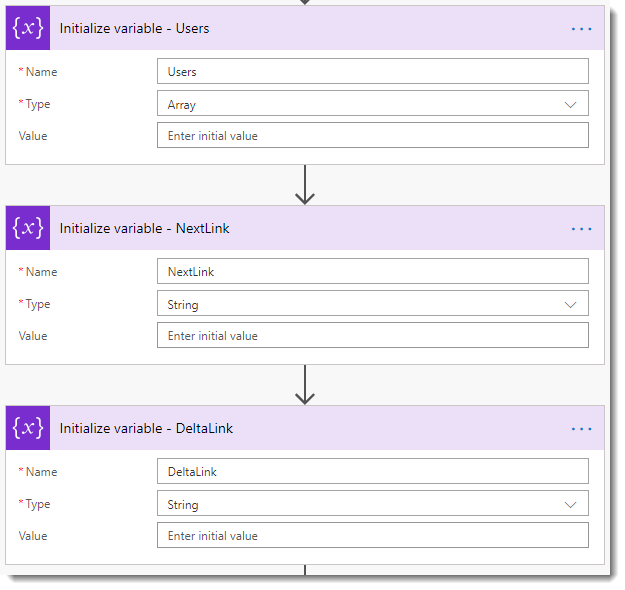
Now that we are authenticated, we are going to use the access token for every subsequent request. When we get a response from the groups request it is going to return Users and either a nextLink or a deltaLink. So we need variables for these three items.
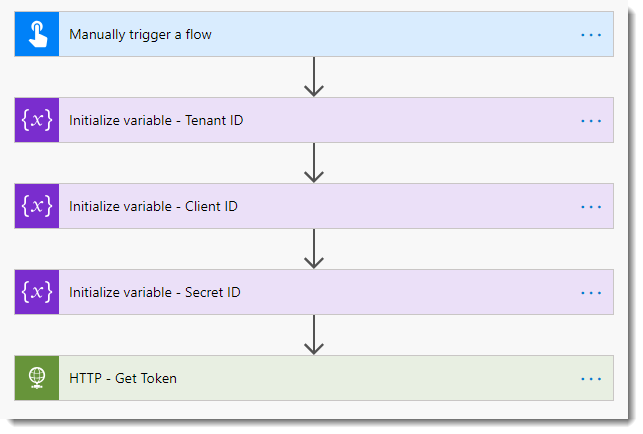
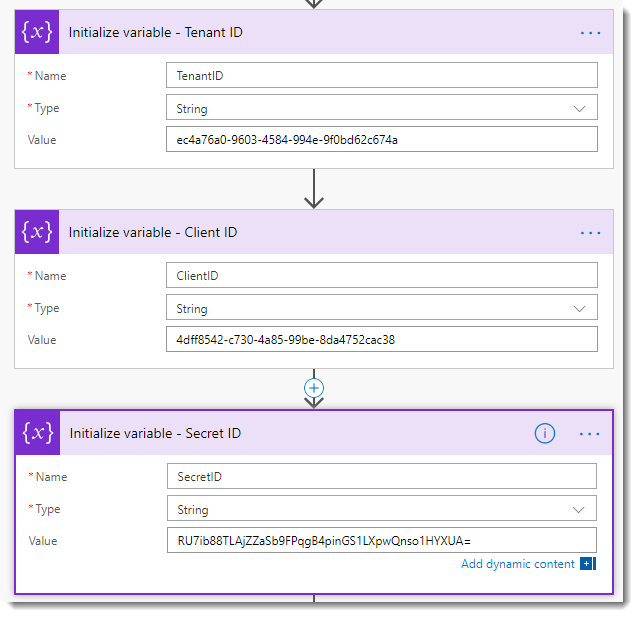
Edit your Flow and under the Initialize Variable - Secret ID add three more Initialize variable actions.
Name them Initialize Variable - Users, Initialize Variable - NextLink, and Initialize Variable - DeltaLink respectively.
Set the Type for Users to Array.
Set the Type for NextLink and DeltaLink to String.
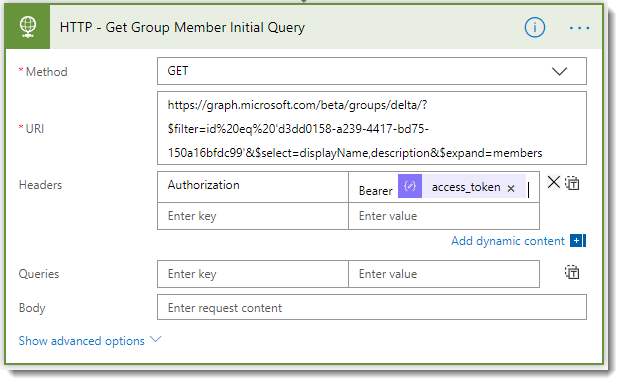
Add an HTTP action to the bottom of the Flow. Rename it to HTTP - Get Group Members Initial Query.
Configure the action as follows:
Method: GET
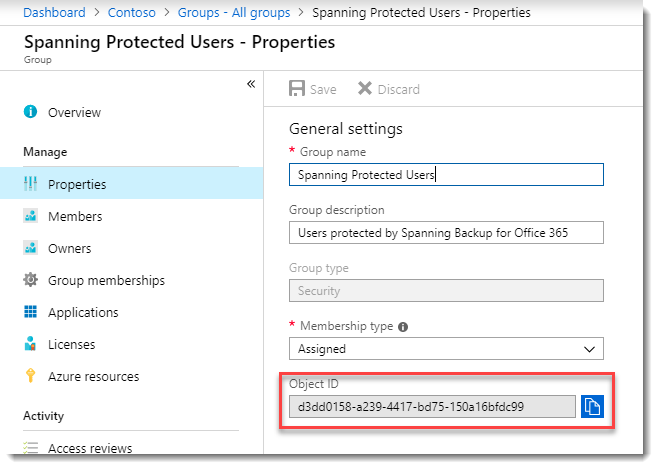
URI: https://graph.microsoft.com/beta/groups/delta/?$filter=id%20eq%20’{group id}’&$select=displayName,description&$expand=members (Where group ID is the unique identifier of the group from Azure AD.)
My URI looks like this:
Headers: Authorization : Bearer {access token} (Important note: There is a [space] between the word “Bearer” and the access token. Failing to include it caused me many wasted hours!)
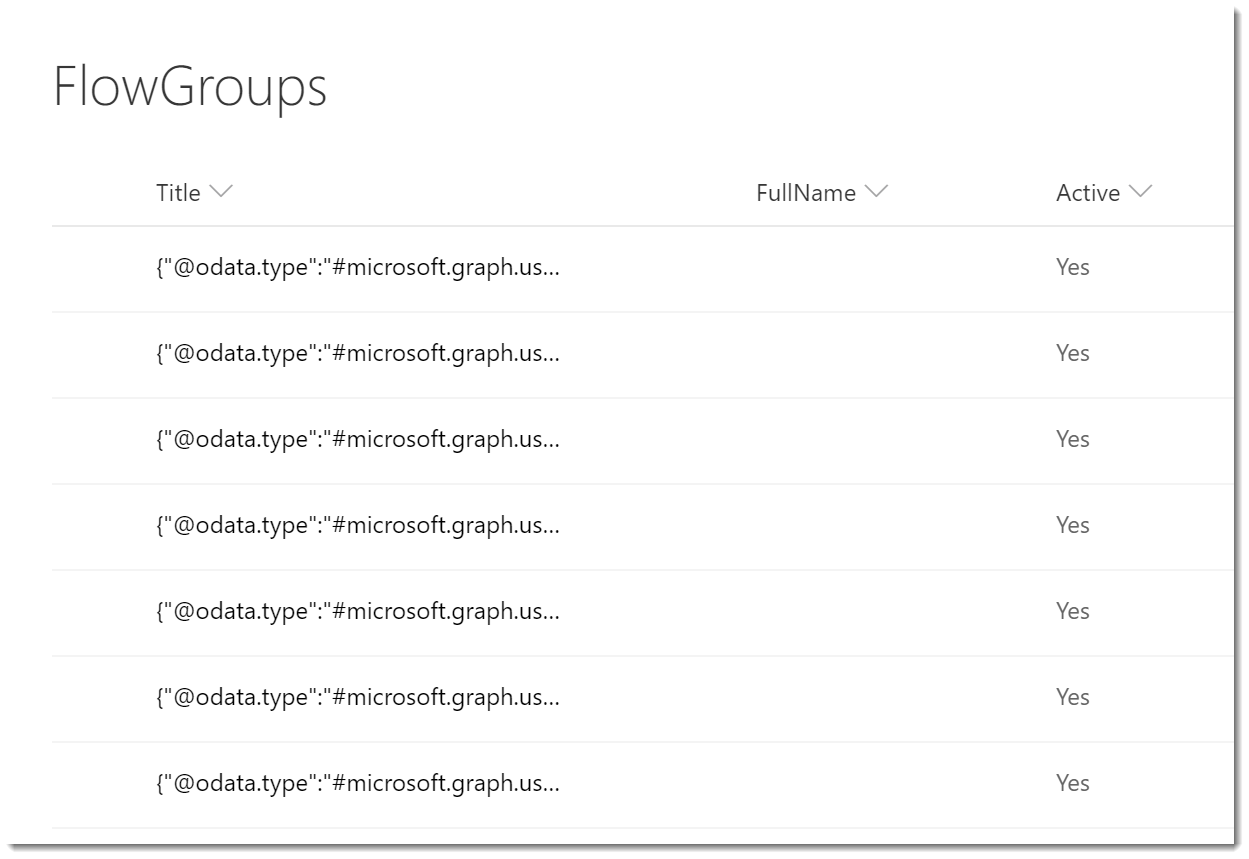
Save and test your Flow. You should see in the Body of the response the Display Name of the group you queried. Below that you should see group members.
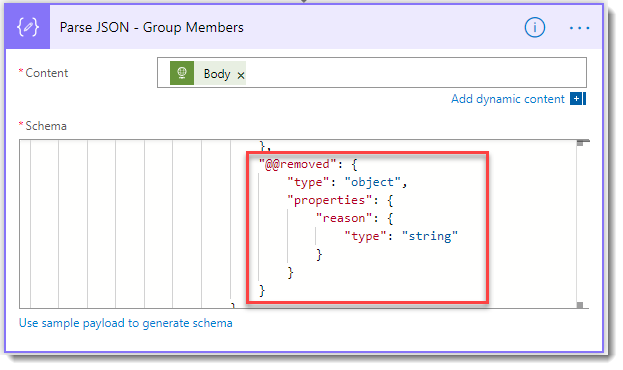
Pretty cool isn’t it! All we have to do now is process the JSON like we did before and decide what to do with the users. Notice that there are two kinds of users; two are current members of the group and one was removed by deletion. Copy the body of the response and do yourself a favor - reorder the member data so that the deleted user is first. Like this:
In the next section we’re going to add a Parse JSON action and use this result to prep the schema. The schema tools is pretty lazy, it only looks at the first object and we want to be sure that @removed is part of the schema. Otherwise you are at the mercy of the Flow expression editor; personally I’d prefer a slow walk across hot coals.
Process the Request
Since this is just a demo, and I don’t know what you want to do with your users, I am just going to write them to a SharePoint list. First we have to process the JSON. We’ll use the same technique as before.
Edit your flow and add a Parse JSON action below the HTTP - Get Group Member Initial Query. Rename the action Parse JSON - Group Members.
Set the Content property to the body of the HTTP - Get Group Member Initial Query.
Click the Use sample payload… link and paste in your updated response. Click Done and check that the resulting Schema includes the @@removed object.
Save and test your Flow. As before, you should see that the parse action properly handled the Get Groups response.
Process the Group Response
Now that we have the user info, it is up to you to decide what you want to do with each user. In our case we’ll just write them to a SharePoint list. The main thing is that you need to submit another request using the nextLink that was returned in the response until you get a deltaLink.
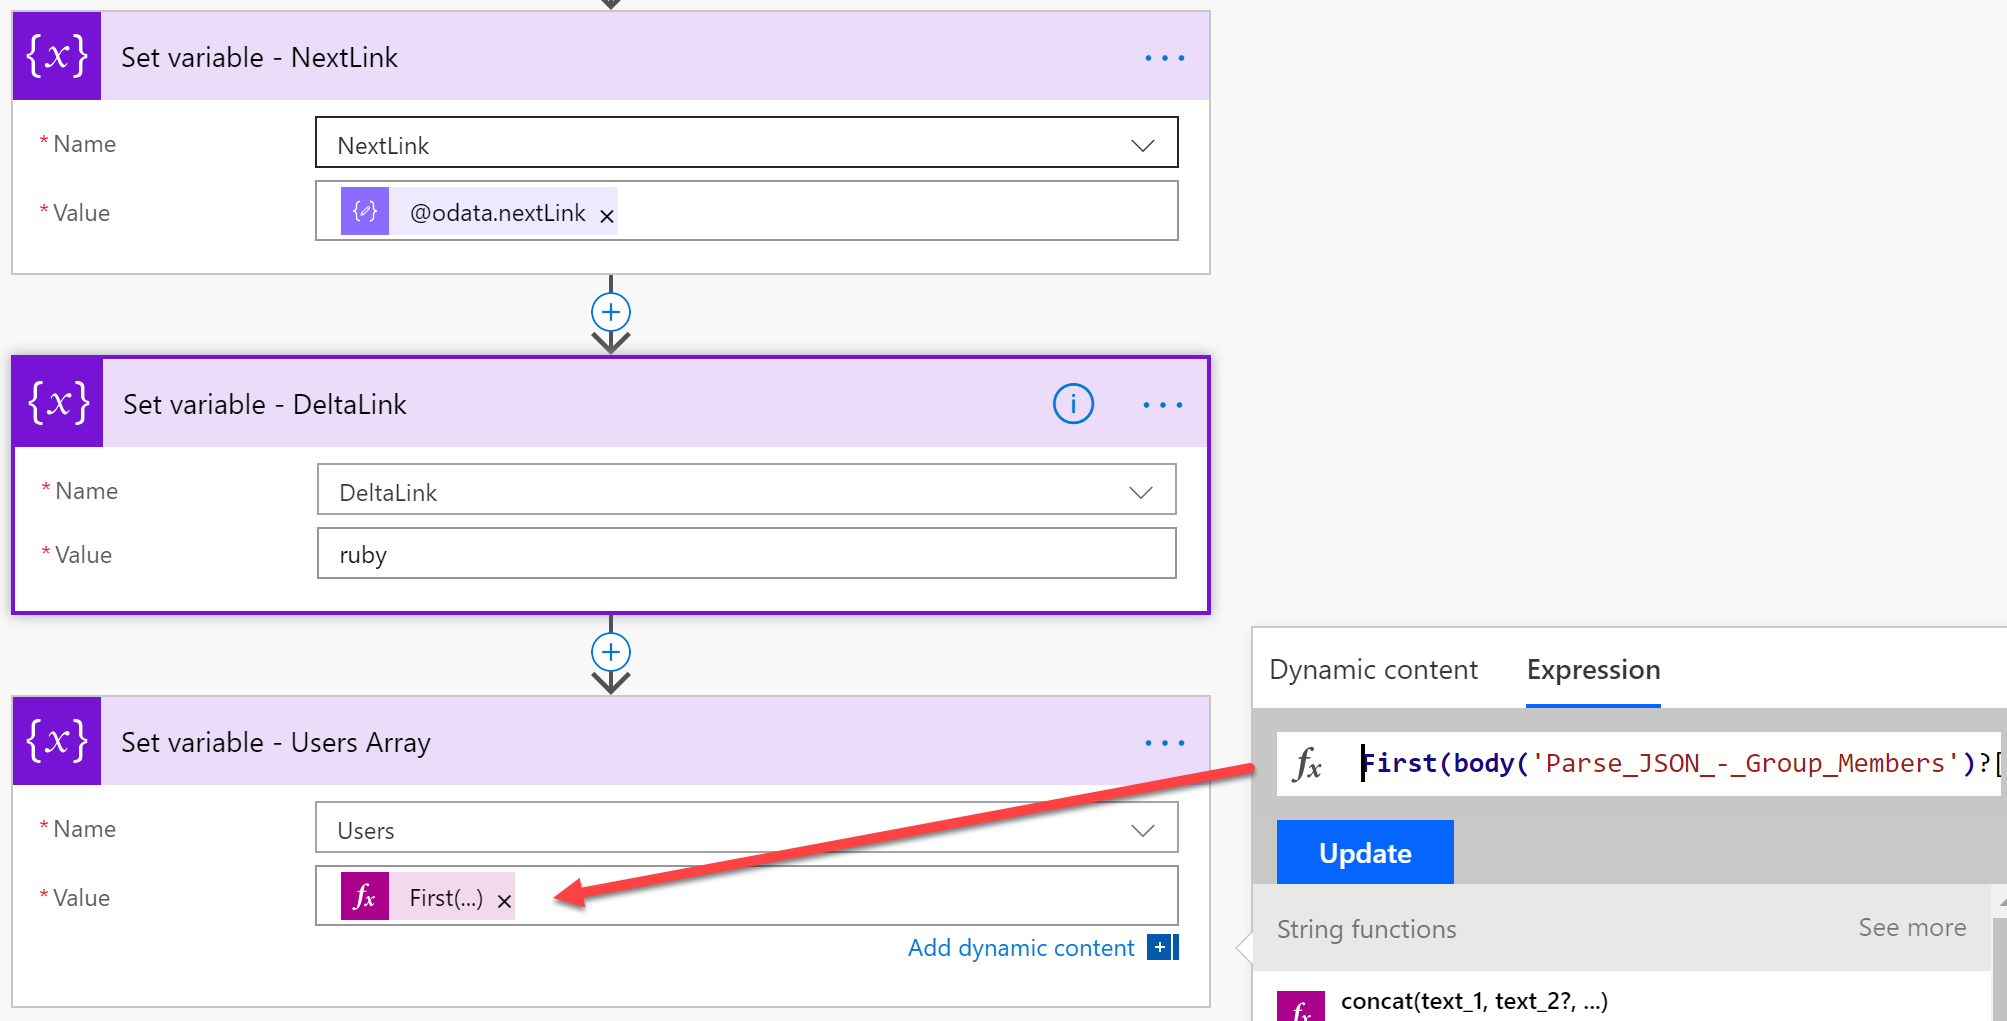
Let’s start by storing the necessary info from our Get into our variables. Add three Set variable actions and name them:
Set variable - NextLink
Set variable - DeltaLink
Set variable - Users Array.
Set the NextLink variable Value property to the Parse JSON - NextLink property @odata.nextLink.
Set the Users Array variable Value property to the Parse JSON - NextLink property to the Expression First(body('Parse_JSON_-_Group_Members')?['value'])['members@delta']. This expression will grab the array of Users and load them into the variable so we can loop over them.
We’ll use the Delta Link variable later, so for now just put my dog’s name in there so we can save the Flow.
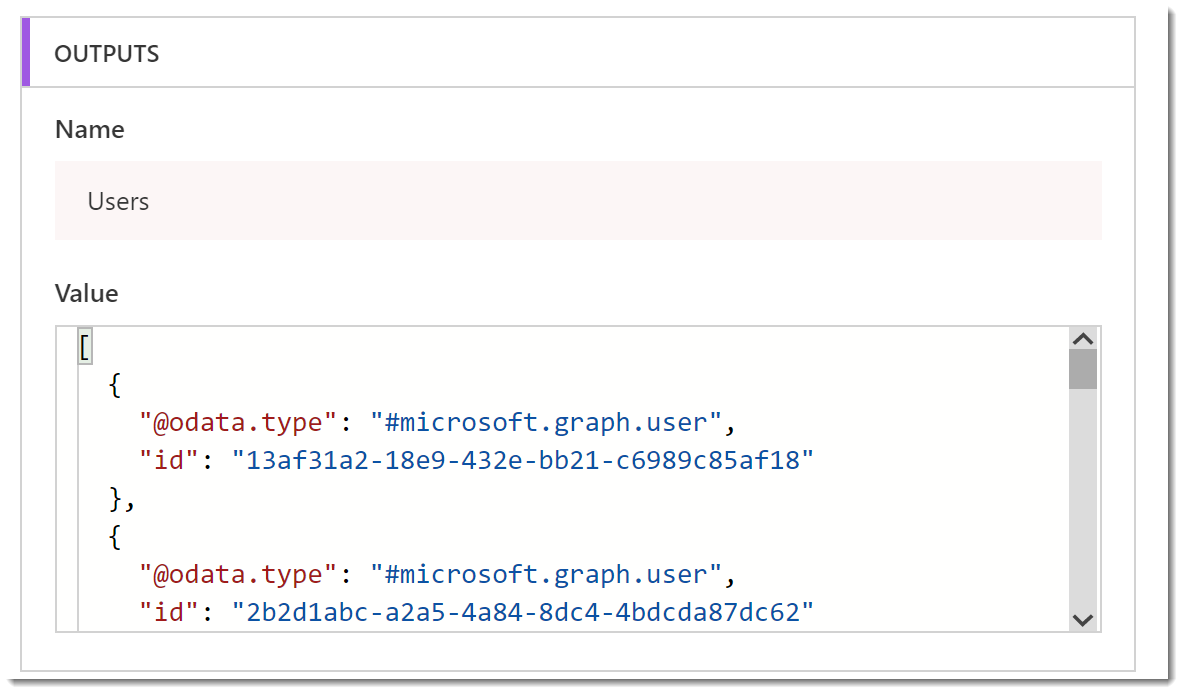
Save and test your flow. You should see that the variables are populated. In this case here is the Users variable.
Process the Users
OK, this is where teaching and documenting Flow gets a bit tricky. We need to loop through the Users and then request more until we don’t get a nextLink but get a deltaLink instead. In Flow that means Do-Until we have no users, Apply to Each user, If the user is not deleted, and then Do Something with the user - in our case we’ll record the user in SharePoint. (If you want to see all this visually, take a look at the Visio diagram in the first post.) Here we go:
At the bottom of your Flow add a Do until step.
Inside the Do until add an Apply to each step.
Inside the Apply to each step add a Condition step.
Inside the Yes side of the Condition add a Create Item action.
Rename all of the steps as follows:
“Do until - Users Array is Empty”
“Apply to each - User in Array”
“Condition - User Not Removed”
“Create item - Group Member”
Set the Do until condition to @empty(variables('Users')) in Advanced mode.
In the Apply to each add the Users variable.
In the Condition - User Not Removed in Advanced mode set the condition to @equals(items('Apply_to_each_-_User_in_Array')?['@removed']?['reason'], null).
In the Create item - Group Member choose your SharePoint Site and FlowGroups list you created in the first post. Set the Title property to the Current item of the Apply to each - User in Array.
Get the Next Link or Delta Link
Whew! Almost there! One last condition, if we don’t have a nextLink then we have a deltaLink. So after the first batch of users has been processed, check the nextLink and then go get more users or exit the loop.
Under (outside) the Apply to each - User in Array but inside the Do until - Users Array is Empty add a Condition action.
Name the Condition Condition - NextLink is Empty
Set the condition in Advanced mode to @empty(variables('NextLink'))
On the Yes side of the condition add a Set variable action.
Rename the Set variable to Set variable - Clear Users Array
Change the Name to Users and the Value to []. This will empty the Users arrray variable.
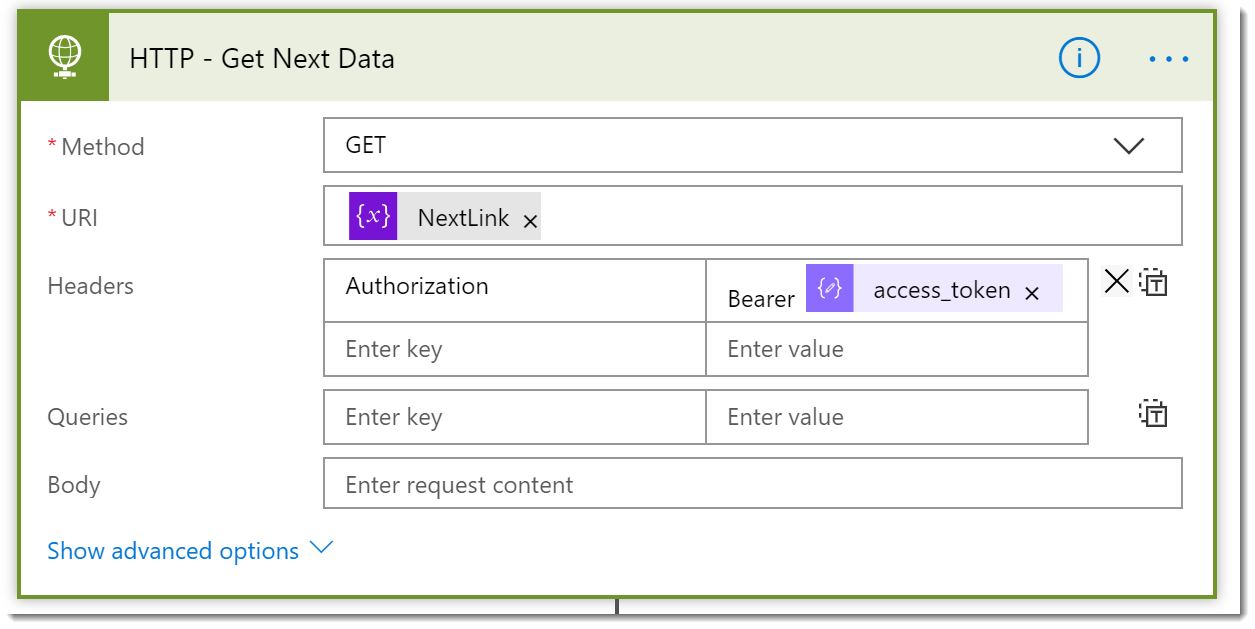
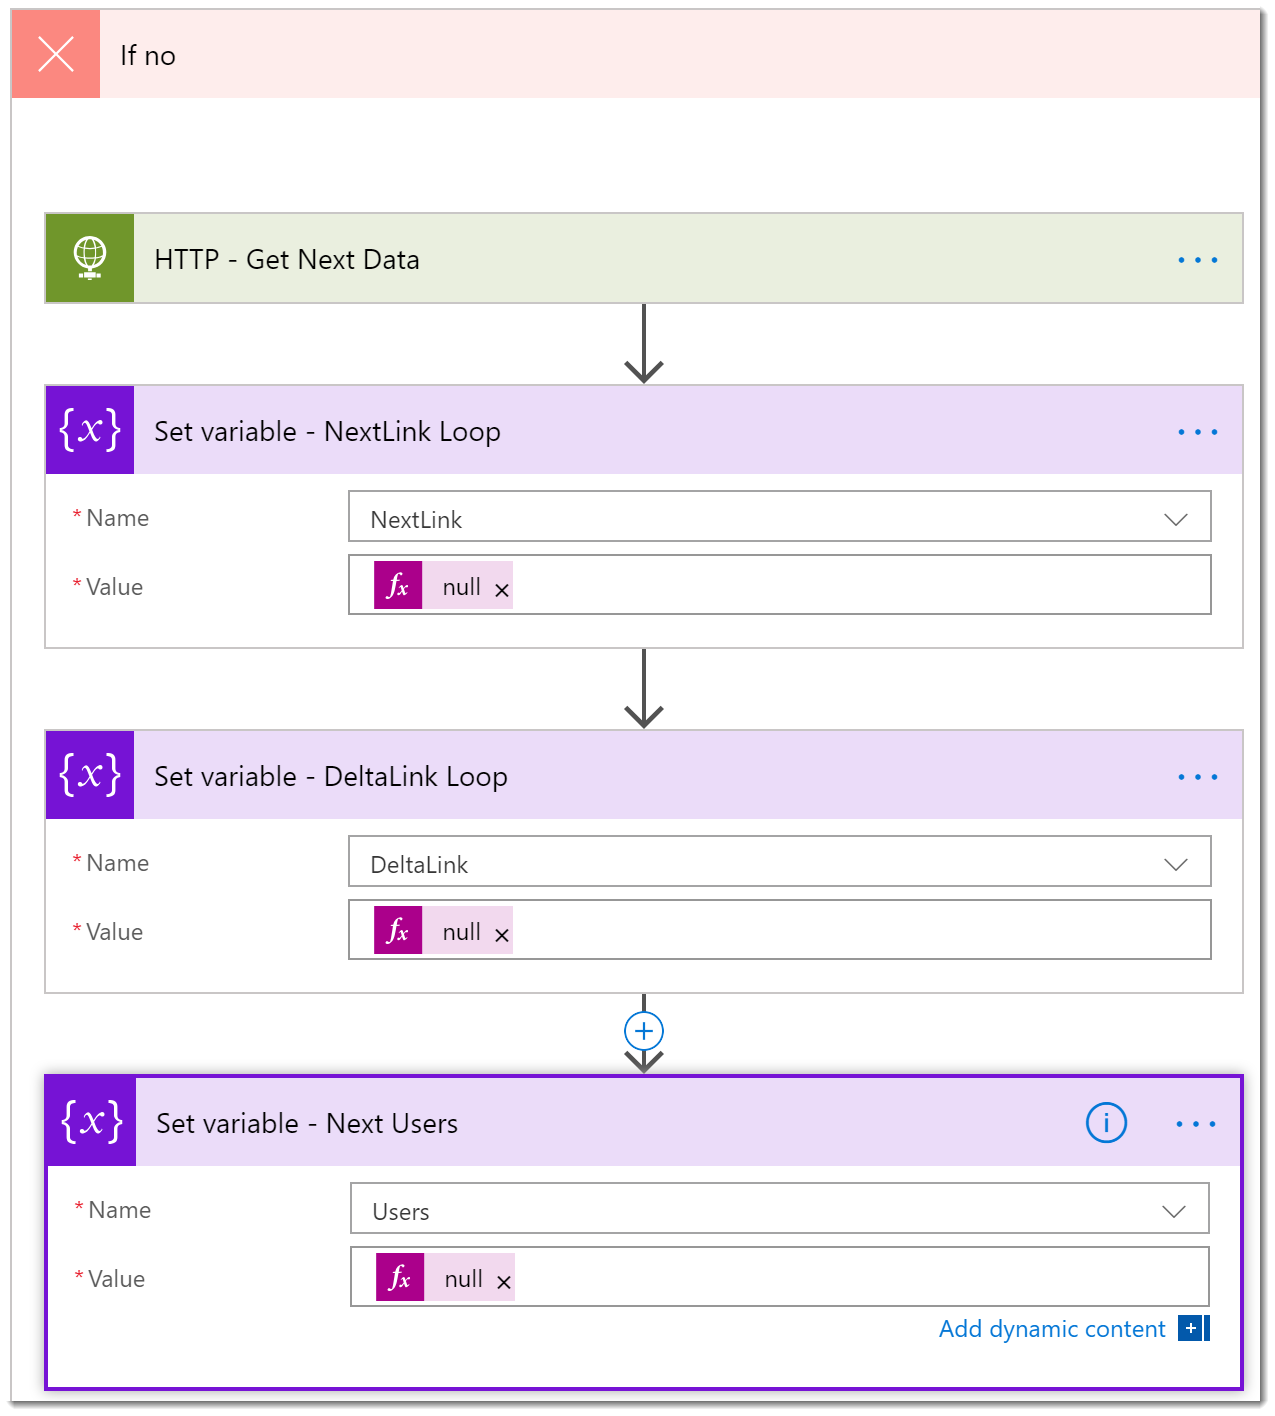
On the No side of the Condition - NextLink is Empty add an HTTP action named HTTP - Get Next Data
Configure HTTP - Get Next Data as follows:
Method: GET
URI: NextLink variable
Headers: Authorization | Bearer {access_token}
Add a Set variable action named Set variable - NextLink Loop, Set variable - DeltaLink Loop, and Set variable - Next Users
Set the Values of each variable to the expression null. This will ensure that our loop only runs one time for now. We need the result so that we can parse the schema later.
Save and Test your Flow.
JSON Parse Trick
Once the Flow runs, check your work. You should see that the Apply to each - User in Array ran for every user, even the deleted ones. What we need right now is the result of the HTTP - Get Next Data. Open the inspector and copy the Body to a text editor.
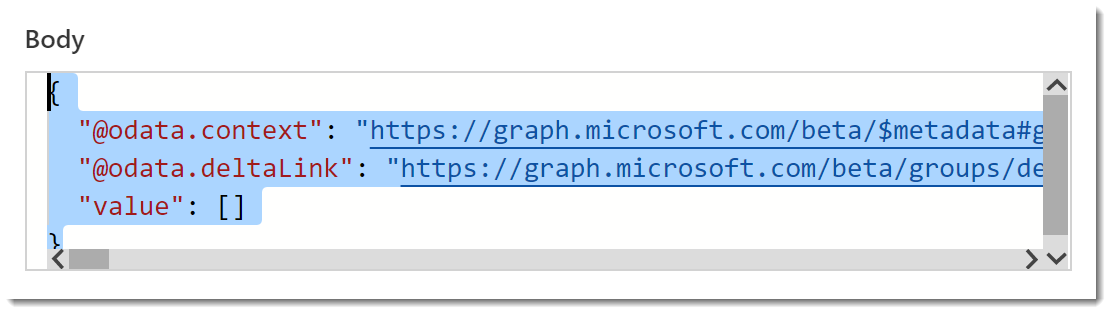
Notice that the format is the same as our original response, it is just missing the nextLink. That’s because there is no more data, so we need to save the deltaLink for the next time we make a request.
Notice that there is no nextLink. Remember that we need to evaluate if there is a nextLink or a deltaLink. Also, remember that the JSON syntax parser is lazy. So let’s do a little work and help that parser. Copy the deltaLink from up above and paste it right under the @odata.context bit in the previous response. It should look like this. (Heck, you could just copy mine, it doesn’t matter.)
Now copy all of that and go back and Edit your Flow.
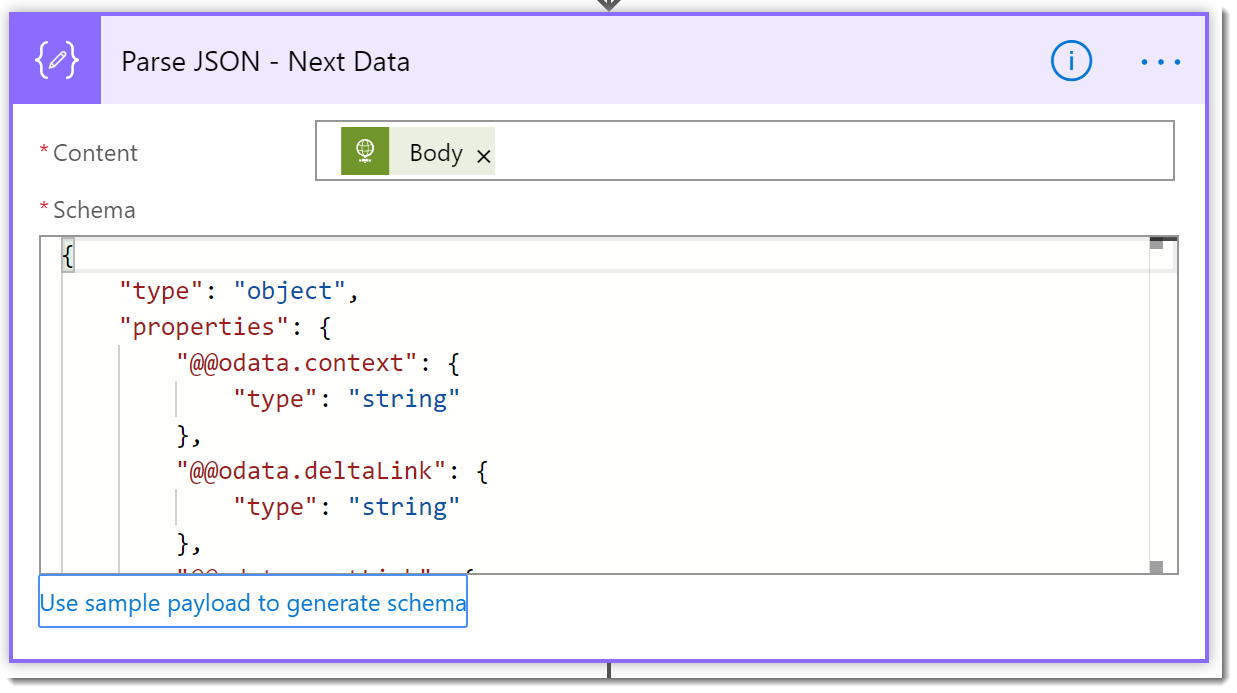
Under HTTP - Get Next Data add a Parse JSON action. Rename it to Parse JSON - Next Data.
Set the Content property to the body of the HTTP - Get Next Data action.
Click Use sample payload… and paste in the edited payload from above including both the deltaLink and the nextLink.
Click Done.
Now you can configure the Variables the right way. Set the NextLink to the Parse JSON - Next Data output @odata.nextLink.
Set the Set the DeltaLink to the Parse JSON - Next Data output @odata.deltaLink
Set the Users array to the expression First(body('Parse_JSON_-_Next_Data')?['value'])?['members@delta']
Save and test your Flow. You should see that user items are getting added to the FlowGroups list on your SharePoint site.
Store the Delta Link
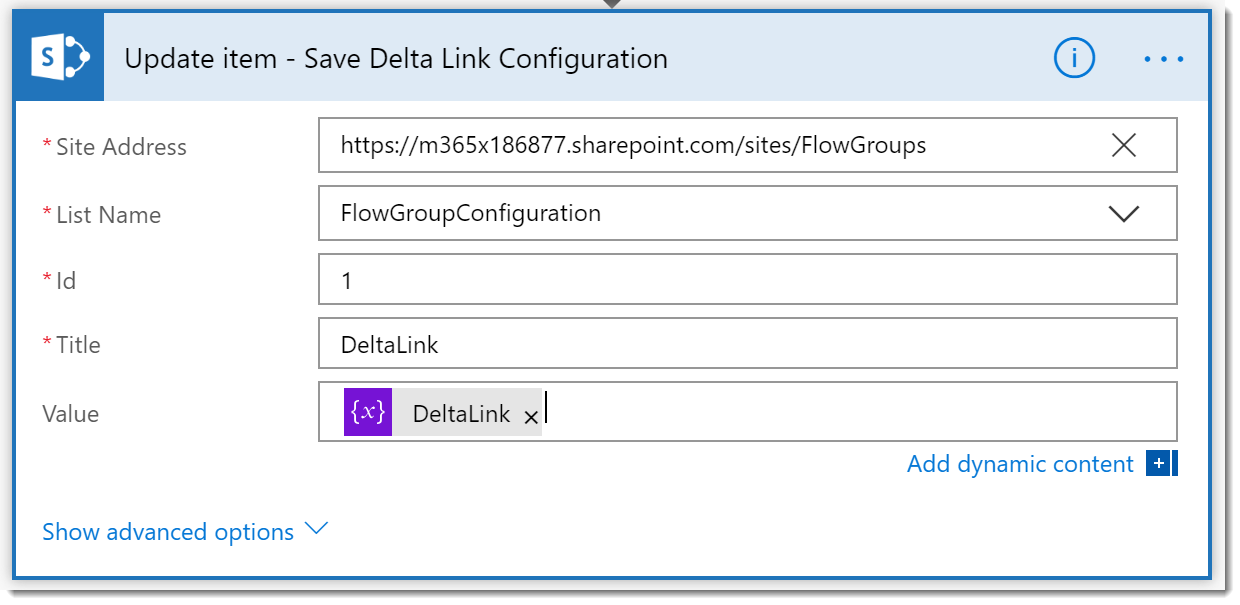
Whew! What now? Well, now that we’ve managed to get through one full cycle, we have to store the deltaLink. Let’s just throw it into our FlowGroupConfiguration list on your SharePoint site.
Edit your Flow.
At the very bottom add a step of Update item. Rename it to Update item - Save Delta Link Configuration.
Configure the action as follows:
Set the Site Address URL to your site.
Set the List Name to your configuration list.
Set the ID to 1. (If you are reading the first item, like I am.)
Set the Title to DeltaLink.
Set the Value to the variable DeltaLink.
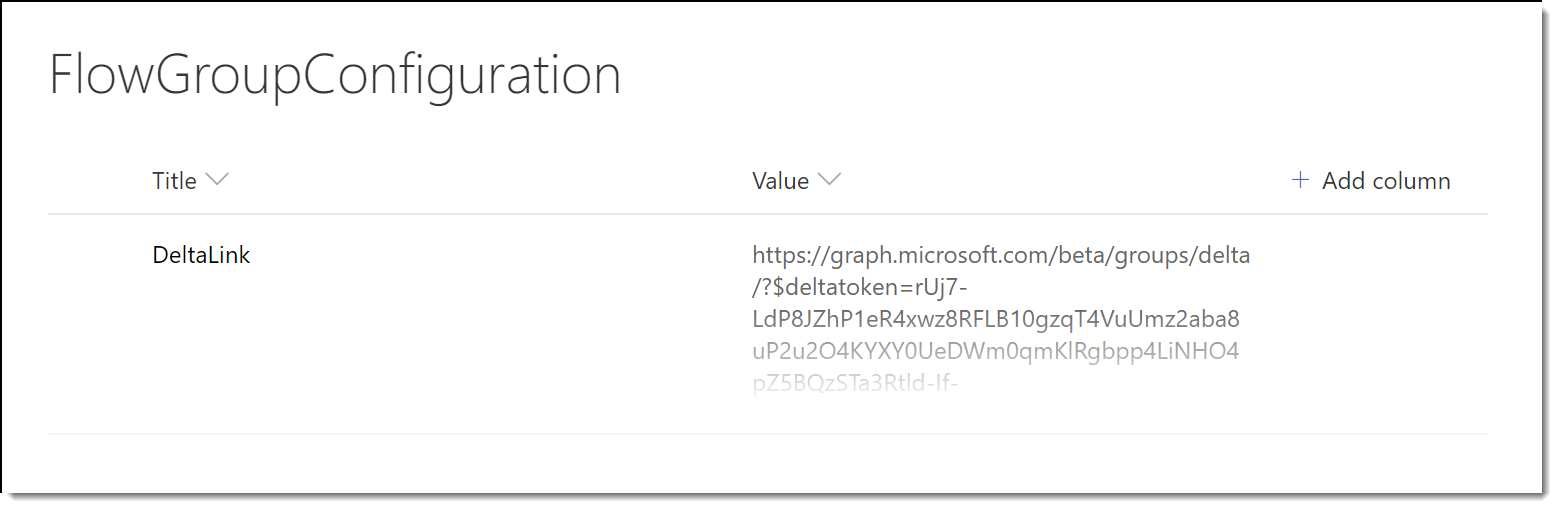
Save and test your Flow. You should now see the Delta Link in your Configuration list when the Flow completes.
Where Are We?
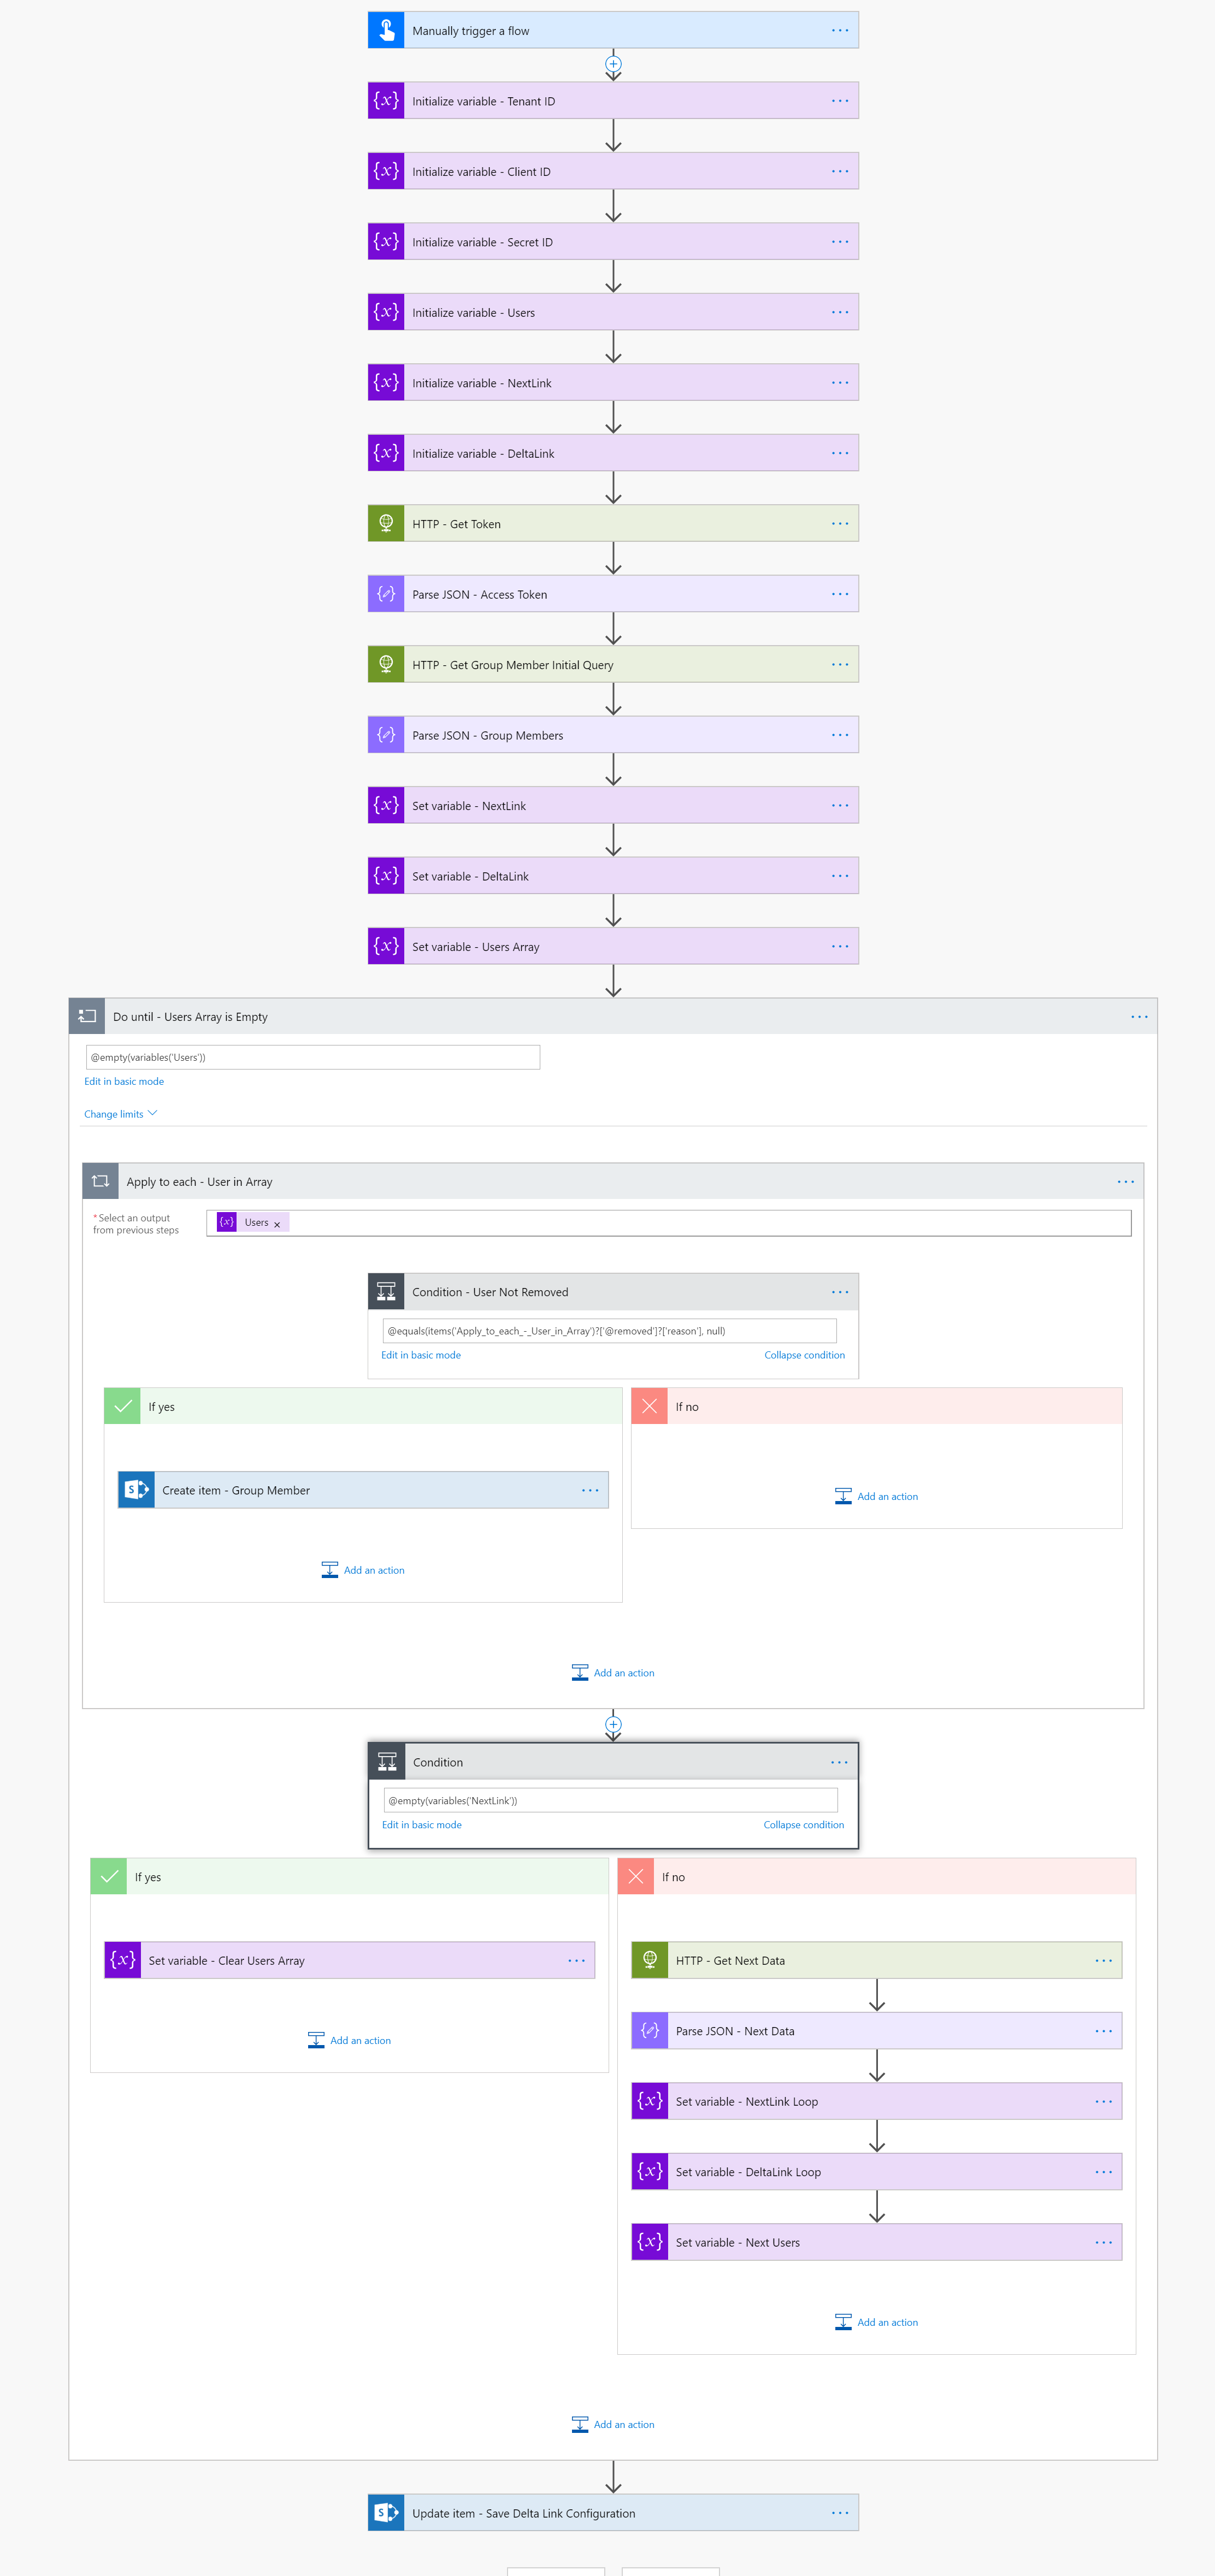
Wow, ok, I admit, that was a lot of work and all we have to show for it is one pass through the Flow. If you got lost along the way don’t panic! I captured the entire flow in a single graphic so you can use it as a map if you get lost.
In the next post in the series we are going to augment our Flow so that it check for the Delta Link and if it doesn’t find it, it’ll run the initializtion. If it does find the Delta Link, it’ll run the Delta Query and only get the items that have changed.