Do you use Best Bets? In SharePoint 2010 and before? Probably not. Don’t get me wrong, I think the IDEA of best bets is great. It is the implementation that misses on many different fronts. SharePoint 2013 introduces a better approach for Best Bets called “Promoted Results” that is a significant step forward in providing you (as the Search Administrator or Site Collection Administrator) to create a search experience that actually helps your users find the stuff that they seek.
The Power Behind Promoted Results
The biggest change to best bets is that in SharePoint 2013 they are driven by Query Rules. Query Rules enable you to create powerful (or simple) pattern matching rules to detect specific queries and then offer promoted results to the user. There is a LOT more that you can do, Promoted Results is just one example, and the reason for this post. So IF you created Best Bets in SharePoint 2010 or before you will have to “upgrade” them to 2013 (which really means recreate them from scratch).
Create a Banner File
A promoted result is either a link or a banner (in 2010 the banner was called a “Visual Best Bet” and was only available in FAST for SharePoint 2010). To begin with you need a destination link. I mean, that’s the point of the promoted result, to force a link on the user based on their query. In our case the training department gave us a file with the text and image needed for publicizing our SharePoint Training Class.
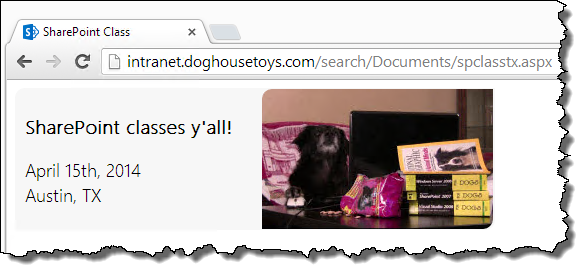
You can host the file just about anywhere, in my case I just added it to the document library on the search site. There are probably some cross domain issues involved in the iframe that will get created by the Best Bet display template. But the one tip I can give you here is this: even if it is just an HTML file, like mine is, give it an ASPX file extension. SharePoint blocks the download of HTML and the iframe will have “issues” but ASPX files appear to work fine. Aside from a bit of CSS there is nothing special about my file. Now that you have your banner file rendering correctly, just copy the URL.
Create a Query Rule
The rest is easy.
-
In your Site Collection navigate to Site Settings | Query Rules.
-
On the Manage Query Rules page set the context for your rule, in my case I choose Local SharePoint Results.
-
Click New Query Rule.
-
Give the rule a name like SharePoint Training.
-
Set the Query Conditions to Advanced Query Text Match (because I want a bit more control).
-
Select Query contains one of these phrases and enter terms to match like “sharepoint;wss;sps;moss;training”
-
Choose the options for your query, in my case I check them all so any query for the terms will return my best bet.
-
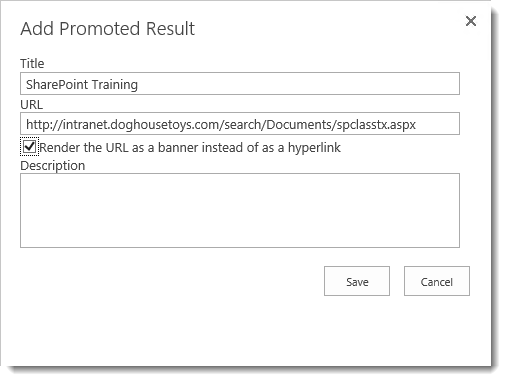
Click Add Promoted Result
- Provide a title like SharePoint Training.
- Paste in the URL to your banner.
- Click the Checkbox for Render the URL as a banner instead of as a hyperlink.
- Click Save.
-
If you need to add an expiration date you can do that with the Publishing Options.
-
Click Save to commit your changes.
Test the Promoted Result
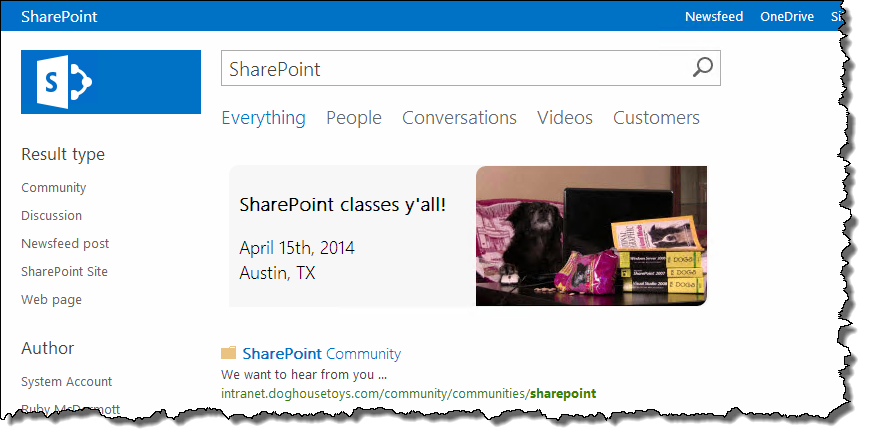
Return to your Search Center and execute a query that will trip your rule. In my case I use “SharePoint Search” or “SharePoint Training” or “MOSS Upgrade” all will return results and have the necessary keywords to trigger my Query Rule.
That’s it. I will tell you that I spent more time working on fitting my banner into the tiny iframe supplied by the Best Bet display template than I did on any other part of this process. I haven’t spent any time trying to change the display template for the promoted result, not yet.