SharePoint 2013 introduces a new technique for presenting search results: Display Templates. If you have worked in previous versions of SharePoint and had to modify the look and feel of Search Results you know how cumbersome it is. In 2013 the new rendering techniques have several distinct advantages.
- Display templates are HTML and JavaScript rather than XSL
- Display templates are configured for the Site and Site Collection rather than for a Web part
- Display templates are applied with rules and logic
- Display templates are applied to individual result items, not the entire result set
- Display Templates are used for Results of all kinds, search results, content by search results, and refiners
- …and the list goes on
In this post I’ll show you the basics of creating a Display Template and then future posts will focus on the cool stuff you can do once you know these basics. I will assume that you are using a Search Site Collection. If you aren’t then you will have to tailor your changes accordingly. I also assume that you know how to deal with Crawled and Managed Properties. I have written about this for 2010 and it’s not too terribly different in 2013, in fact you can do it from the Site Collection now!
The Business
You have to have a reason to change the look of your results. In my case I have added a property to the User Profile called Twitter User Name. This way, users can opt in to showing off their social connection to Twitter. The HR department wants to increase social engagement in the company so they have asked my SharePoint team (me) to add the Twitter link to their People Search result. They would like it to link to the users Twitter profile page. So here we go:

The Basics
-
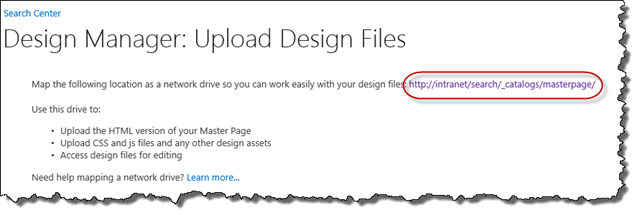
From the Search Center navigate to Site Settings. In the Look and Feel section chose Design Manager.
-
In Design Manager choose Upload Design Files.
-
Click the link at the top of the page to open the Master Page Gallery in Windows Explorer.
-
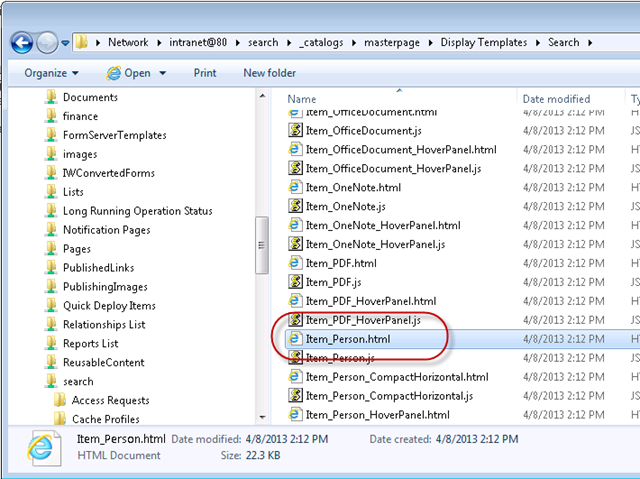
Browse down the folder structure to Display Templates/Search/ and locate the Item_Person.html file. This is the file used for the out of the box People Search result. Notice that there are actually two files named Item_Person. We always work with the HTML file leaving SharePoint to manage the JavaScript file.
-
Copy the Person_Item file to your desktop and rename it to Item_Twitter_Person (this way when we copy it back it won’t overwrite the original file.)
-
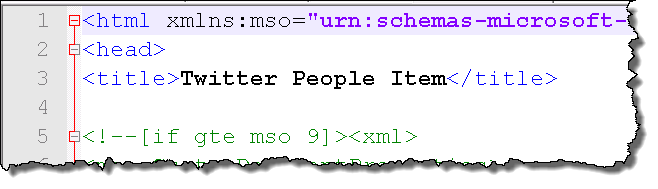
Now open the file in a text editor and find the title tag. Change the title to Twitter People Item.
-
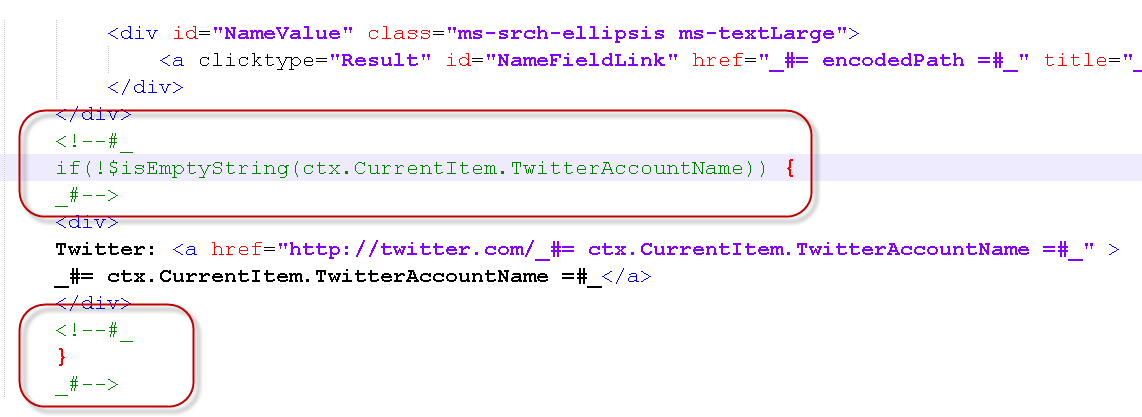
In the next section are a bunch of tags that begin with mso. These control the metadata for the Display Template. The one we’re interested in is the ManagedPropertyMapping tag. We need to add any new custom properties to this tag before we can display that property in the page. This is where you have to decide what Managed Properties from the Search Service you are going to use in your page. In my case the fine IT folks told me it was called TwitterAccountName. So I’ll add that to the end of the line. Pay attention to the syntax here. (In a later post I’ll discuss more about the syntax of this declaration. For now just duplicate the field name.)

-
Now we need to add the field to the display part of the page. If I were to create a link to Twitter for my own account it would look like this: Twitter: MatthewMcD What I need to do is swap out my account with a token that will be replaced by the user in the search results. Microsoft introduced a new token that we will use for this purpose _#= to start and =#_ to end. That combination of characters will tell SharePoint to look at what’s in between and treat it like JavaScript. So what we need now is a way to reference our field TwitterAccountName. We do that by referencing the Context of the Current Item in the search results. All put together it looks like this: #= ctx.CurrentItem.TwitterAccountName =#. So now our code looks like this inserted below the NameValue div:

-
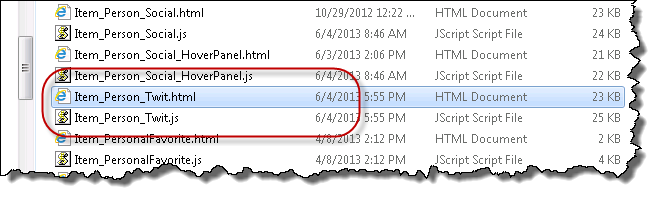
Save the file and copy it back to the server by dragging it back to the Search Display Templates folder where you started. If you refresh the Explorer windows you will notice that SharePoint automatically created a matching .js file.
-
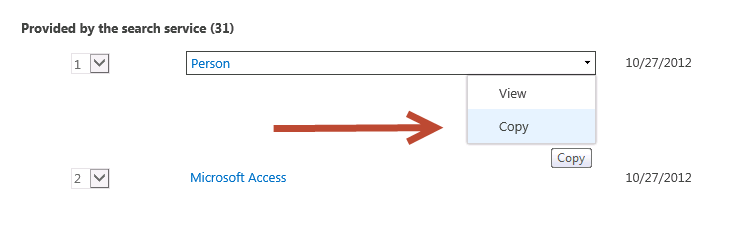
Now we need to tell SharePoint when to use our new Display Template. We do this with a Result Type. Return to Site Settings and choose Search Result Types from the Site Collection Administration section.
-
Locate the Person result type, hover click and choose Copy.
-
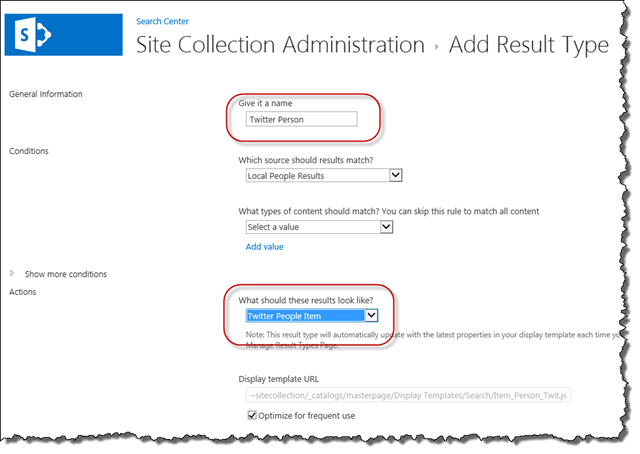
Change the name to Twitter Person and change the Action | What should these results look like? to Twitter People Item. Notice how the Display Template URL changes to the JavaScript sister file SharePoint created.
-
Click Save and return to the Search Center to check your work.
-
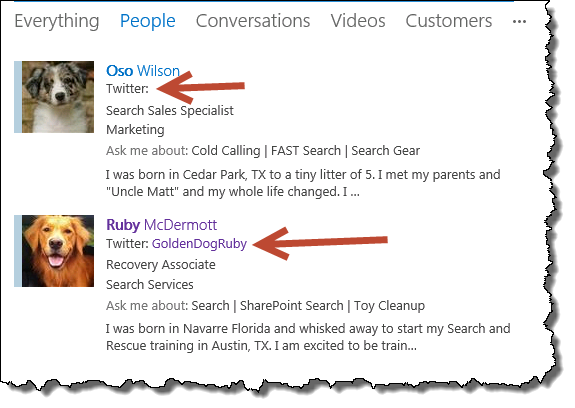
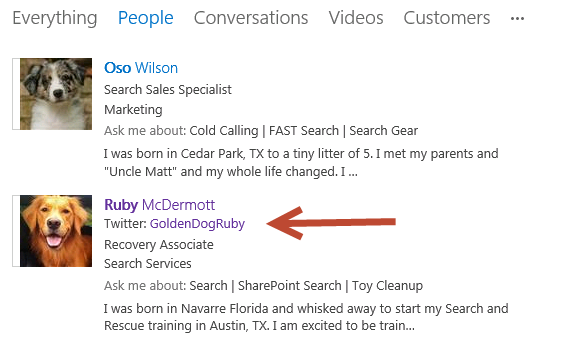
Execute a search on the People Search vertical and you should see the results of your work.
-
So we achieved our goal, but there’s something I don’t like about the result. Oso does not have a Twitter account, so we should not show the “Twitter:” text. This is a simple change and demonstrates the last basic concept for the article.
-
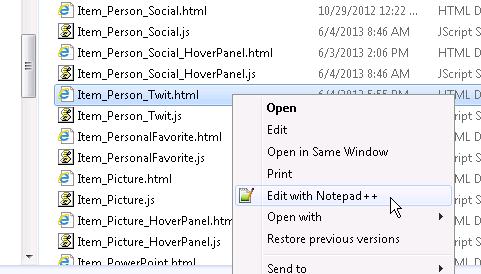
You can open and edit the Display Template right our of the Explorer window. Then each time you save the file it will update on the server immediately. So, go ahead, open the file in your text editor right out of SharePoint.
-
Now that you have the file open we need to add some conditional code so we only write the Twitter tag if the user entered a value. This is super easy. The trick is to tell SharePoint that it is a code block. For that I’ll use an HTML comment and our special tag again. This is what our code looks like now. I added my JavaScript in between the comments and wrapped it around my divs.
-
Return to the Search Center and test the search. You should see that the values only display when they are not blank.
Conclusion
So what have we learned?
- You can use a text editor to create Display Templates from copies of the out of the box files.
- You can embed and emit custom managed properties in your search results.
- You can run JavaScript in your Display Template for conditional formatting.
Please remember that Display Templates, like other assets in the Master Page Gallery, must be Published in order for everyone to see them. Once you have completed your edits, return to the Mater Page Gallery and Publish and Approve the files so that your users will be able to see them.
Download the file used in this sample: Item_Person_Twit.zip
What’s Next? Well, I think I am going to show you once and for all how to display the SharePoint presence icon and hover card in search results….next time!