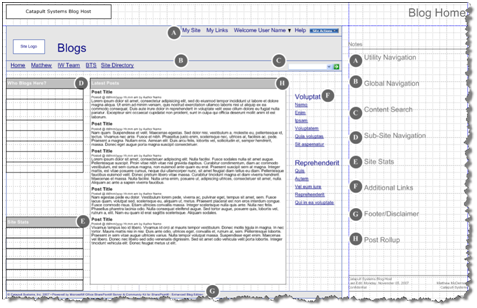
In the previous post we created a web application to host our blog sites and built a Table of Contents with the TOC web part. We still have work to do to finish our home page. Our home page wireframe calls for a Recent Posts web part. In this post we’ll cover the configuration of the web part and CSS to make it pretty. The summary of the steps are:
- Create a “Recent Posts” rollup
- Create a custom CSS for the site
Wireframe for home page
Create a “Recent Posts” roll-up
Our wireframe calls for a rollup of recent post activity in the middle of our home page. We will use a Content Query web part for this purpose. Most of the functionality that we require for the rollup will necessitate hand editing the web part.
-
Place the home page in edit mode and click Add a Web Part to our Top Zone.
-
Choose the Content Query web part and click Add.
-
Edit the web part properties by choosing Edit | Modify shared web part.
-
Change the settings as follows:
Property Value Query Source Show items from all sites List Type Posts Content Type List Content Types; Items; Include Child Types Presentation Feed Enable Feed Title Catapult Systems Blogs Feed Description Blogs about technology and miscellaneous ramblings from our employees Appearance Title Recent Posts -
Apply your changes and your web part should look like this:
Advanced web part configuration
We have gotten just about as far as we can with the out of the box configuration for our web part. We have yet to meet our requirements. The issues are:
- The roll up does not show the post body, publish date and time or author
- The posts are not ordered by Published date
- The default styles do not suit our designers, so we need a custom cascading style sheet
- The RSS feed for the web part does not include the post body or author
To solve these deficiencies we need to use a combination of techniques. We will start by creating a new list item style and apply it to our web part. We will also add the additional fields required to display our post content.
Customize the content query web part
There are many great posts about how to customize the Content Query web part. I will not go into that level of detail here. I will use two new templates to complete our work. One will expose the fields available in the query. The other will roll up our posts.
-
Open the blog host site in SharePoint Designer and navigate to the Style Library. Open the folder XSL Style Sheets. Check Out and Open the file ItemStyle.xsl.
-
In code view locate the ending
</xsl:stylesheet>tag. Immediately above the end tag insert the following code.<xsl:template name="CQFields" match="Row[@Style='CQFields']" mode="itemstyle"> <xsl:for-each select="@*">P:<xsl:value-of select="name()" /> </xsl:for-each> </xsl:template> <xsl:template name="BlogRecentPosts" match="Row[@Style='BlogRecentPosts']" mode="itemstyle"> <xsl:variable name="SafeLinkUrl"><xsl:call-template name="OuterTemplate.GetSafeLink"><xsl:with-param name="UrlColumnName" select="'LinkUrl'"/> </xsl:call-template> </xsl:variable> <xsl:variable name="DisplayTitle"><xsl:call-template name="OuterTemplate.GetTitle"> <xsl:with-param name="Title" select="@Title"/> <xsl:with-param name="UrlColumnName" select="'LinkUrl'"/> </xsl:call-template> </xsl:variable> <xsl:variable name="LinkTarget"> <xsl:if test="@OpenInNewWindow = 'True'" >_blank</xsl:if> </xsl:variable> <div id="post"> <div class="postTitle"> <h2>{$SafeLinkUrl}" target="{$LinkTarget}" title="{@LinkToolTip}"> <xsl:value-of select="$DisplayTitle"/> </h2> </div> <div class="byLine"> posted @ <xsl:value-of select="msxsl:format-date(substring-before(@PublishedDate, ' '), 'MM/dd/yyy ')" /> <xsl:value-of select="msxsl:format-time(substring-after(@PublishedDate, ' '), 'hh:mm tt')" /> by <xsl:value-of select="@Author" /> </div><div class="postBody"> <xsl:value-of select="@Body" disable-output-escaping="yes" /> </div> </div> </xsl:template>The first template, CQFields, renders the fields from the query so you can check your work. The second template is our post roll up template. This template requires our web part to deliver the fields Published Date, Body, and Author. We need to change our web part to make this template work.
-
Return to the home page and choose Site Settings | Edit Page. From the web part Edit menu choose Export Save the web part to your desktop.
-
Open the web part file in Notepad and locate the line:
Change it to:<property name="CommonViewFields" type="string"/><property name="CommonViewFields" type="string">Body, RichHTML;PublishedDate, DateTime</property> -
We also need to add the
PublishedDatefield to our sort order. Locate the line:And replace it with:<property name="AdditionalGroupAndSortFields" type="string" null="true" /><property name="AdditionalGroupAndSortFields" type="string" >PublishedDate,Published Date</property> -
Return to your home page and delete the Recent Posts web part. Click Add a web part and choose Advanced Web Part gallery and options from the bottom of the dialog.
-
Click the Browse header and choose Import from the menu.
-
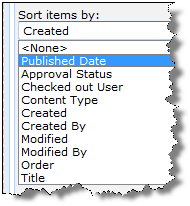
Browse for your edited web part file and choose Open. Click Upload to upload your web part. Drag your recent posts web part into the top zone. The web part should look the same as before. Choose Edit | Modify shared web part. In the Presentation section click the drop down for Sort items by: and choose Published Date. Click Apply to save your changes.
-
In step 4 we added additional fields to our web part. “CQFields” helps you see what fields are returned. In the web part Presentation section change the Item style to CQFields and apply your changes. Your web part should look like this:
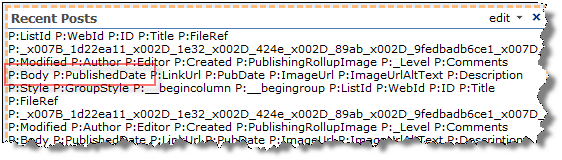
Notice our new fields Body and PublishedDate.
-
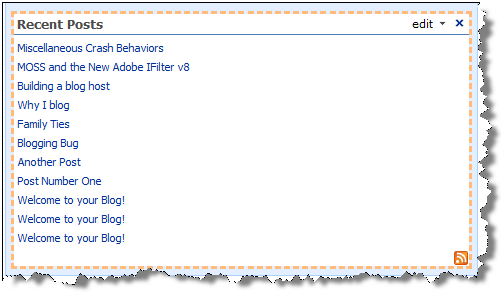
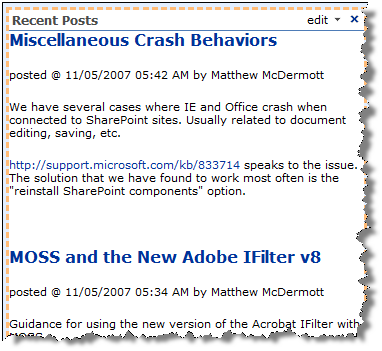
Changing the Item style to BlogRecentPosts should yield the following look:
-
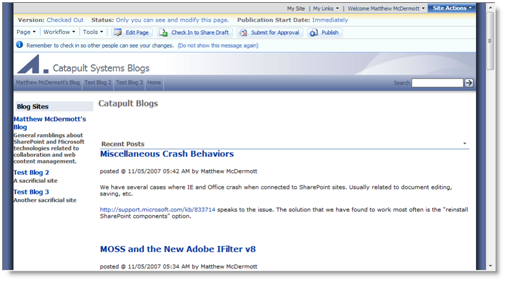
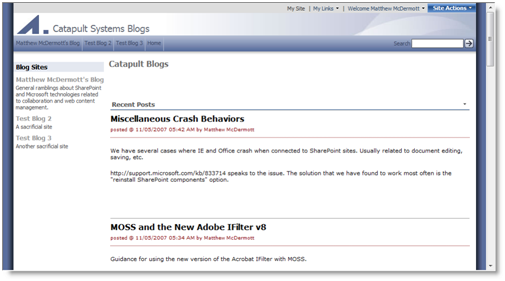
Click OK to save your changes and your page should look like this:
Create a custom CSS for the site
Heather Solomon and Shane Peran have written extensively on writing CSS for SharePoint.
-
Create a new css file in SharePoint Designer by browsing to the Style Library and right click and choose New | CSS.
-
Rename the file blog.css.
-
Open the file and insert the following code.
div.postTitle h2 { border-top: 1px #999999 solid; font-family: Verdana; line-height: 17pt; padding-top: 5px; padding-bottom: .1em; margin-bottom: 2px; margin-top: 0px; } .postBody { padding-bottom: 20px; } .byLine { color: maroon; font-family: Verdana; font-size: 7pt; padding-bottom: 10px; border-bottom: 1px maroon dotted; margin-bottom: 10px; } .ms-WPBody a:link { color: black; text-decoration: none; } .ms-WPBody a:visited { color: #999999; text-decoration: none; } .ms-WPBody a:visited:hover, .ms-WPBody a:link:hover { text-decoration: underline; } .level-description { font-weight: normal; } /* TOC web Part */ #tocwp.toc-layout-main { padding-left: 5px; } .level-header { white-space:nowrap; } div.item { margin-left : 0px; padding-left: 5px; } -
Save the file and check it in.
-
Return to the site and choose Site Actions | Site Settings | Modify All Site Settings
-
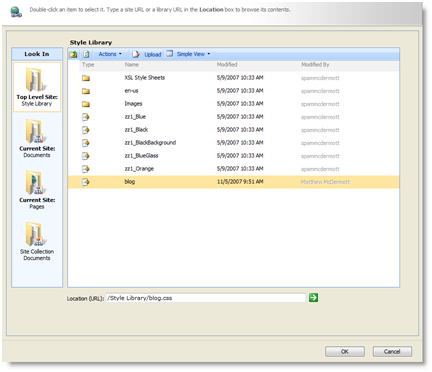
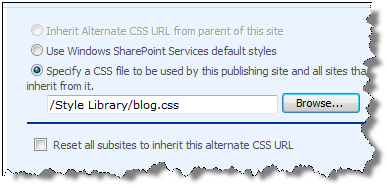
Choose Master page and in the Alternate CSS URL section select the Specify a CSS file radio button. Browse for the blog.css file we just created.
-
Click OK to select the file.
-
Your settings should look like this:
-
Click OK to apply the styles.
-
Your page should look like this:
Summary
Are we done? Maybe, maybe not In our next post we’ll customize the RSS output.