In the previous post we created a web application to host our blog sites. We created the blog sites and have added a few posts to each to prepare for the creation of our blog host home page. Now our designer has provided the requirements for the home page and we are ready to go. The summary of steps is:
- Create a new home page layout
- Configure a TOC web part for the “Who blogs with us” section
- Create a “Recent Posts” rollup
- Create a custom CSS for the site
- Configure the RSS feed for the web part
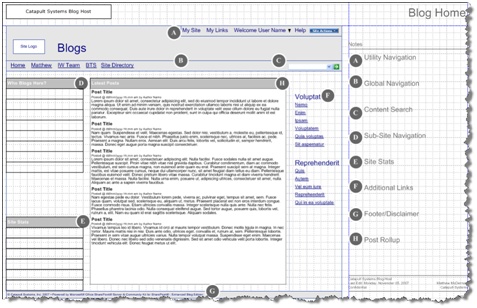
Wireframe for home page
Create a new home page layout
-
We will begin by copying the WelcomeTOC page layout. Open your blog host site in SharePoint Designer and navigate to the Master Page Gallery. Locate the WelcomeTOC.aspx page layout and right click-drag-drop the file and choose Copy.
-
Rename the new file to BlogWelcome.aspx. Check the page out and change its title by right clicking it and choose Properties. Change the title to “Blog Welcome page with table of contents”.
-
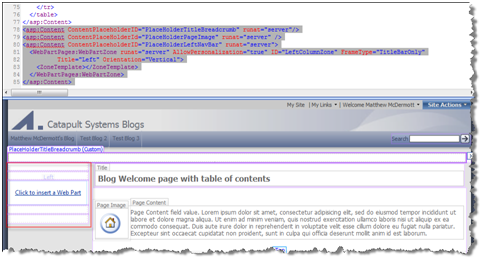
Open the page in SharePoint Designer and scroll to the bottom of the code. Insert the following two lines below the last
</asp:content>tag:<asp:Content ContentPlaceholderID="PlaceHolderTitleBreadcrumb" runat="server"/> <asp:Content ContentPlaceHolderId="PlaceHolderPageImage" runat="server" /> <asp:Content ContentPlaceholderID="PlaceHolderLeftNavBar" runat="server"> <WebPartPages:WebPartZone runat="server" AllowPersonalization="true" ID="LeftNavZone" FrameType="TitleBarOnly" Title="Left TOC" Orientation="Vertical"> <ZoneTemplate> </ZoneTemplate> </WebPartPages:WebPartZone> </asp:Content> -
Save the page and you should see the left navigation disappear and be replaced by a web part zone.
-
Check in and publish the page layout.
-
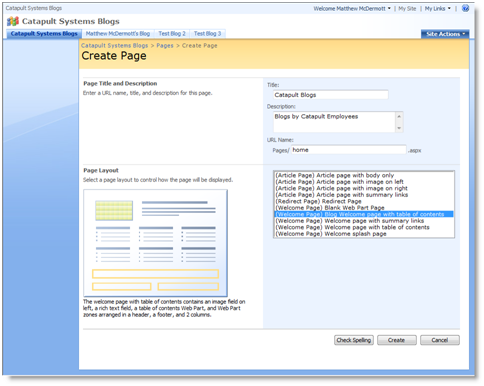
Now I need to create our new home page. From the blog host home page choose Site Actions | Create Page.
-
On the Create Page page, complete the necessary information and choose our new “Blog Welcome page with table of contents” page layout.
-
Choose Create to create your page.
-
Publish the page and choose Site Actions | Site Settings | Modify All Site Settings. Choose Welcome Page and change the welcome page to our new page “home.aspx”.
Create a list of blog sites with descriptions
Our wireframe calls for a list of blog sites with descriptions on the left. The Table of Contents web part will work well for this.
-
From our new home page Site Actions | Edit Page.
-
In the Table of Contents web part choose Edit | Modify shared web part.
-
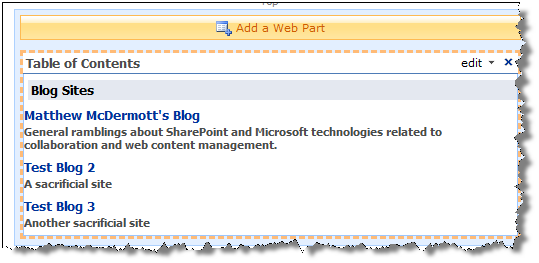
Change the settings as follows:
Property Value Content Start From / Levels to show 1 Show Pages Off Presentation Heading Text Blog Sites Header Style Banded Display Columns 1 Vertical 1 Style Vertical with descriptions Appearance Chrome Style None -
Apply your changes and your web part should look like this:
-
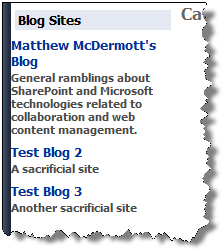
Drag your web part into the Left TOC web part zone. Preview your page and it should look similar to the image below. The styling is a bit off, but we will fix that.
Summary
In this post we have built a new home page layout and configured a TOC Web Part. Next post we’ll finish the home page with a Recent Posts web part and CSS.